From the nice people at this company
we have gotten access to their cell-libraries for the
UMC 0.13um process.
It consists of two digital
libraries (high speed and low leakage) with standard cells
and io-
pads. A memory compiler and some PLL stuff are also available.
Use of this kit is restricted to
those granted access.
The procedure for synthesis, place-and-route, and final touch
up with the layout editor de-
scribed below is intended for the 8metal version of the process. The
tools used are
- Synopsys Design Compiler v2007.03 : Design Synthesis
- Faraday Memory Compiler v2007 : Memory
and Register generator
- Mentor Graphics ModelSim v6.3a : VHDL
and Verilog Simulation
- Cadence Encounter v6.2
: Place and Route.
Setup
All the tools needed are initialized by one command which
should be run in an empty sub-
directory. A lot of setup and example files will be created if they
do not already exist.
> source /usr/local-tde/cad3/far07/allsetup
If the laboratory machines on the efd-domain are to used, this is the
correct setup command
> inittde farall
The setup routine will create a file structure like this
StartDir
______________________|___________________
|
|
|
|
|
vhdl netlists
WORK work
soc
Use
StartDir as default location when running
Synopsys
or
ModelSim. Before using the
Encounter tool, descend into the library
soc. The function
of the other directories are
- vhdl
: folder for vhdl-files.
- netlists
: output files from synthesis
- work & WORK : storage libraries for ModelSim
and Synopsys.
Synthesis with Synopsys
There are two libraries available (
high speed and
low
leakage ), both have standard cells
and IO cells. The search paths are specified in the file
'.synopsys_dc.setup'.
fsc0h_d_sc
: High Speed, Standard Cells
All libs has
_tc,_
bc, and
_wc
fsc0h_a33_t33_generic_io :
High Speed, IO Cells
versions. Changes
are made in
fsc0l_d_sc
: Low Leakage , Standard Cells the
.synopsys_* files as usual.
fsc0l_a33_t33_generic_io :
Low Leakage, IO Cells
Some manuals can be found
in
$FAR_LIB/hsdoc/ and
$FAR_LIB/lldoc/
.
The synthesis program is started by the command
design_vision
.
There is a small example that can be studied. Use
'source comp.dv'
to start.
Memory Compiler
The
Faraday memory compiler (v200701) for the fusion
process is also made available
by the startup script
. The main gui is then started
by the command
'memaker'.
Some documentation can be found in the directory
$FTC/doc
.
Simulation
Simulation is performed in the
ModelSim v6.2 tool, which can
handle both vhdl and verilog
files. Simulation can be executed before or after synthesis.
The vhdl file produced by
Synopsys has to be modified before
simulation. The library infor-
mation is not sufficient. The command
> $FAR_LIB/fixvhdl my-vhdl-file
will perform the required modifications.
Place'n'Route
The place-and-route of the construction is performed by the
Cadence tool
Encounter.
It is started with the command '
encounter'. Do
not use an ampersand (&) here. The window
from which
Encounter is started will serve as the command input
window.
The setup command
will copy some setup- and command
files that executes an example design
in
Encounter. The entire session is then launched by
the command
'source MedFilt.com' from
the command window. Naturally the commands are also available from
the tool menues.
As shown in the example pad placement file
'MedFilt.io'
the corner- and power pads can be in-
troduced in this file. There is no need to edit them into the verilog
file.
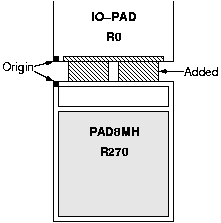
When the design is ready, it has to be moved into the
layout editor (
dfII) for final fixing up, bond-
pads have to be added. The pads used do not contain any bonding
area.
DRC checks must also be
executed. The transfer of the design is done by exporting
a
stream file, which describes the entire
design, from
Encounter. Invoke the command
Design
> Save > GDS and fill in the names of the
stream file to be created and of the mapfile,
faraday_soc.map.
The layout tools described below are not currently
available on the efd-domain.
Cadence Layout
Look
here for information about
how to initialize and start up the
Virtuoso Layout Editor.
Follow this procedure to import the design, as a
stream-file,
from
Encounter.
* Copy the
Layer map-file, $UMC_DIR/stream.map
.
* Create a
Cadence library, to hold the design, and
attach it to the '
umc13mmrf' technology.
* Execute the command '
File > Import > Stream'.
Fill in
Input File and the name of the newly
created library. In the
User-Defined Data
form, enter the name of the
Layer map-file and in
the
Options window, select
Retain
Reference Library and enter
'FAR07_HIO FAR07_HSC'
at
Reference Library Order. If the
Low-Leakage cells has been used, use the library names
'
FAR07_LIO FAR07_LSC' instead.
The design should now exist in the desired library and can be
further dealt with as described below.
Adding Bonding Area